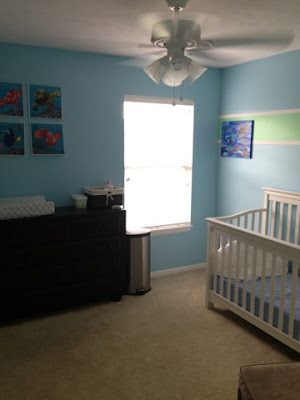
So this pregnancy, instead of making another nursery, we gave Lincoln a new room. When we had made his nursery 2 years ago, this was always the plan. I made his nursery neutral so that I could do this...here is the post on his nursery from 2 years ago.
The room next the nursery is the room we decided to make his. Here is what we started with.
our first project was to empty the room...Luckily we have one "bedroom" left to keep all this furniture in

 Then we had to paint the trim...because I for some reason think this will be a wonderful improvement to our house...and since I've started I can't go back...
What A MESS!!! Such a pain in the butt...it took 1 coat of primer, 3 coats of color....then I had to paint the ceiling, because try as I might I didn't know what color the ceiling was and you always need to know incase of touch ups...
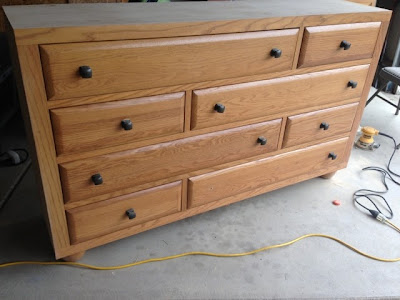
After I did all that I went on the hunt for a new dresser. I didn't want to spend a lot, but I wanted something nice. So I searched craigslist for days. The issue with working nights is it's hard to find a time to go "look" at it. Plus Adam works unruly hours, but finally mom dad and I were able to find this one for only $250 but it came with a mirror that I don't really know what to do with.
The first step was to sand this beautiful thing... 2.5 hrs later this is what we had...
Ain't it a beauty....Now came the staining...I wanted to stain it because I wanted it to be as close to an espresso finish as possible.
First coat is done....I had to wait 6-8 hrs between coats...so time consuming!!

Second coat looks so much better!!

Here it is after the 4th coat I believe...it's either the 3rd or 4th, I can't quite remember...

And then here it is completed. It took 5 coats of stain. After the stain I used some steel wool to sort of get rid of some of the imperfections and bugs that had stuck to the dresser. Then I used a spray paint polyurethane and I did about 1.5 coats of that. For the whole dresser I used one bottle. Then I had to find some new hardware for it. I chose a darker finish so that it wouldn't stand out like a sore thumb. Overall I'm quite pleased with it for my first ever project. It took a lot of hard labor and it's not perfect but overall I'm happy with it.
Here it is start to finish....
After the dresser was done I started on painting the room. My dad hung a ceiling fan, because I can't live without a fan and I'm hoping to stay in this house for another 10-15 years and I figure the kids would appreciate it later in life, plus I can keep their vents closed and use a fan and it's still a cool temp in there vs our room which is like a sauna!
So I started by coming up/stealing a design from a friend. I knew I wanted to do for a theme so I knew I wanted the color to be blue, but then the night before I was going to paint I decided I wanted two colors so I stole this design from a friend who is due a week before me. :)
Then it came to picking out colors and painting. My mom and I went to a concert and Adam started on the painting. He painted the bulk of the blue, and I edged the blue when I got home and painted the green. I really like these colors...
Without the tape...
I'm so pleased with it :)
And because I am not good at using a drop cloth my mom spent hours using paint thinner to get out my paint stains from the carpet then I shampooed the room...


Looks pretty good If I do say so myself :)
Now for decorating...I'm not good at art at all. I'd like to think I'm crafty but I'm really not. I also didn't want to do a big mural like I did in the baby room because I figure in 5 years or so Lincoln may not love Finding Nemo like he does now so we can always do a different theme but keep the color.
So to find my decorations I searched etsy with little success, but I did find these. Which I just framed.

I had the lady make me the P. Sherman one, and I think it looks awesome.
Then I decided to search Amazon. I found some vinyl decals that I ordered and cut up and decided to put on canvases. First I found these 4 pictures that I just put on a canvas then modge podged over it to get it to stick.

Next I cut up some other vinyl characters and decided which ones I wanted and then painted some canvases and again modge podged them to the canvases so they would stick.

here is all 3 of them.
The hard part was figuring out where to put all of them. Like I've said before I'm not good with decorating.
I also ordered his name in block letters that the lady is doing in a finding nemo theme. They will hopefully be here soon.
I didn't have all his decorations done and up when he first moved into his room. The first few nights were rather challenging for him. We tried to make is special by having both Adam and I put him down, we said our prayers and laid him in bed. He screamed like crazy and we felt so bad for him because he was obviously just not comfortable in his surroundings. Adam and I both tried to calm his down, and finally I just grabbed a pillow and laid on the floor next to him and held his hand. When he finally calmed down I left and he screamed for a little bit but then fell asleep no problem and slept until 8:30 the next morning (too bad he didn't fall asleep until almost midnight).
The next few nights were not as bad but still very challenging. So I finally decided to bring in his glider and ottoman and try rocking him to sleep. Before we'd moved him we always sat in the chair and read our books and said our prayers before going to bed. Well bringing the glider in made a huge difference. I think it helped him clam down a bit and he went to bed a lot easier from then on out. It took about a week or so but now he knows it's his room and enjoys playing in it and even goes to bed really easily.
So here is the final and (almost, minus the name which should be here tomorrow) room :)
As you walk in...mind the toddler head at the bottom of the picture.
From the door
The reading corner...
All that is left is me having to put his name above his bed when we get it. :)
Overall I'm pretty pleased with how it turned out. I'm not very good with decorating but thus far the 3 rooms I've really spent a lot of time on and worked hard at I'm pleased with. Now to finish our banister and trim in out "guest" bathroom and the upstairs will be all done except for the back "bedroom". I guess I should start thinking about the basement next...


No comments:
Post a Comment